Knife sharpeners may seem like a frivolous expense to most people, and I completely understand that. Sharpeners are something that most people don't know how to use, don't know what to get, and/or seem expensive. However, I say that a knife sharpener is one of the very basic things you need in your kitchen. Right after you've bought a decent knife and a cutting board, you absolutely need a knife sharpener to keep your knife useable. See, your knife starts going dull as soon as you start using it. First you won't be able to cut tomatoes, then fruits, then vegetables, and the next thing you know, you've cut your thumb while trying to muscle your way through a chicken breast.
Remember when I said a dull knife is the most dangerous knife? It's absolutely true, and the lesser the quality of your knife, the more it will go dull. The question is, is it worth it to cut your hand open often to avoid buying a sharpener? I guarantee buying a sharpener is cheaper than a hospital visit to stitch up your hand. I also guarantee that it's cheaper than buying a new knife every time yours gets dull.
There are three types of sharpeners I want to discuss: Crock sticks, stones, and electric, but before that, I want to tell you about an experience I had last week. See, we have at least 3 different sharpeners in our kitchen, but I had seen these commercials for a $15 sharpener on television and I was curious if they worked. I figured that, if one of those would work for you, then you wouldn't have to be as concerned about price. Everyone can put away $7 a month for 2 months to prevent a hospital trip, in my opinion. So, I went to Wal-Mart in their "As Seen on TV" section and bought this:
 I have a lot of experience with different kinds of sharpeners, so I took it home and my dad and I gave it a try. We found the dullest knife in our kitchen - the one that wouldn't cut a tomato (you need a razor's edge on a knife to cut a tomato without squishing it) and ran it through this "miracle product" several times. The blade would not cut the tomato. So, next, we found a blade that would cut the tomato and ran it through the Samurai Pro. The knife would no longer cut the tomato.
In my opinion, that pretty much sums up my opinion about the $15 knife sharpener that you can get on the "As Seen on TV" section of different mega stores. I think that if you buy this, you not only won't get sharp knives, you'll probably end up dulling the ones you have, rendering them more dangerous.
Anyway, on to sharpeners I believe work. As I said before, there are three types of sharpeners I'm going to talk about and at the end I'm going to throw in a paragraph or two about steels as well as a paragraph about using what you have in your kitchen to do the same thing (but it's a little advanced).
Let's start with the basics - why does your knife get dull? Well, it has to do with a lot of different things. First, the amount you use your knife, will, of course, get more dull the more you use it. This is because it wears down as you use it, just like the tires on your car and the soles on your shoes. Logic dictates that, the more you cook, the more you'll use your knife and the more it'll go dull. Second, the type of cutting board, or lack thereof, can have an impact on your knife's sharpness. According to wood cutting board lovers, the blade of your knife can slide through wood grain at a molecular level which prevents dulling while plastic cutting boards press on the edge and dull it. However, my opinion is that you can take that money you saved by buying a plastic board instead of a wood board and use it to buy one of these sharpeners. Finally, sometimes, your knife isn't always dull. Sometimes, it just needs to be honed. The difference is that, when you sharpen a knife, you actually take a little bit of metal off the knife. If you sharpen too much, at a coarse grit, you'll wear away at the knife. Alternatively, honing a knife re-aligns the metal molecules and makes your knife sharper by comparison. There are two options on this list that both sharpen and hone your knife to reduce wear and tear on your knives.
Crock Sticks $10 - $55
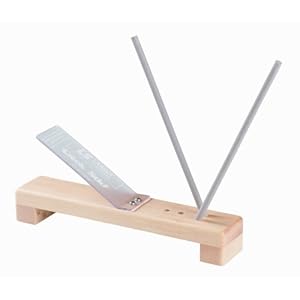 Crock sticks are ceramic rods that are (usually) positioned at a 45º angle to one another while secured to a wooden or metal base. The ceramic has a grit that can either sharpen or hone your knife. A basic setup for one of these is about $20 to $25 and it comes with either medium or fine grit sticks. A medium grit stick will actually sharpen your knife while a fine grit will hone your knife.
The nice thing about these is that you can buy sticks with different grits for about $5. That means that if you buy a set that has one grit, you can get another grit for relatively cheap. Sets that come with three different types of sticks go for about $55 and you can buy the sticks on their own for $10.
The only problem with crock sticks is that finding them is often difficult. You won't find them in a cooking store, nor will you find them in the cooking tools area of your local store. In fact, I can only find them in sporting goods stores. That's because most stores assume that the only time you'd choose to use this method of sharpening is when you're cooking. However, my dad uses it at least once a week. Here's how to use a set of crock sticks like the ones above.
Stones $10 - $75
Sharpening stones come in two types: wet and oil. They also come in multiple grits, coarse, medium and fine. If you're going to get a stone, buy at least a medium and a fine. The fine is for your regular honing while the coarse and medium are actually for sharpening. The only difference between the two types is what they need to be whetted with. If you can't figure that out, oil stones are whetted with mineral oil and wet stones with water. The very basic stones are $10 for each stone while a tri-stone with 3 sides and grits goes for between $50 and $75, depending on where you find it.
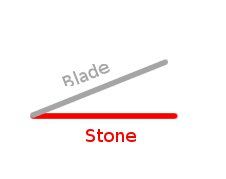
One important thing to remember if you do use an oil stone is to get some mineral oil from the pharmacy to use as the oil. Food-based oils go rancid and make your stone stink.
Here's how you use a sharpening stone:
Electric sharpeners $20 - $400
 There are two distinct positive sides to electric knife sharpeners: First, you can find an electric knife sharpener any-freaking-where. I mean, they're in the cooking aisle in every major "super" store. Second, they are seriously the easiest thing on this list to use. You put the blade in the sharpener's slit and pull it toward you and voila you have a sharp blade! There's no learning curve; there are no angles to remember; and there's no repetition.
Now that you've read that, you may wonder why I don't have an electric knife sharpener. The fact is, that though they have the largest range of prices on this range, they also have the largest range of reliability. See, electric knife sharpeners are kind of like the diet programs of the cooking market. There are some that work just fine, and they cost a lot. There are also very many that either don't work or work very poorly and don't cost nearly as much. Both of them have a cost that could be prevented with hard work, or practice in sharpeners' case.
The major problem I have with even the best electric sharpeners is that they only sharpen your blade. There's no honing with an electric sharpener which means that every time you use one, it's taking a little bit of metal off your blade. That means that, eventually, you're going to wear through the blade of the knife and have to replace it. If you press down on the blade while you're using one of these sharpeners, you can cause the blade to wear out too quickly as well.
If you decide to buy an electric sharpener, do yourself a favor and do your homework. Go to the stores you frequent and write down the brands and types of sharpeners they have (I always have a notebook with me) then go home and search for reviews for those sharpeners on the internet. I have good luck entering something like "Presto 08800 knife sharpener reviews" and I'll get a few different sites. Read the good and the bad on several websites and draw an opinion from those reviews.
Steels $15 - $180
 Steels are one of those things that come with knife kit that many people don't really understand. They're dedicated to honing your knife, not sharpening it. The thing with a sharpening steel is that it aligns the edge of your knife so that it seems sharper. Most chefs use a steel once a day, at the beginning of cooking. When you're only doing major prep work once a day, you can probably get away with doing it once or twice a week.
When I was in school, I was told that steels work by being magnetized and pulling the metal to one side or the other. My father's steel isn't magnetized in any way, shape or form. I can't find anything on the internet that says which way is correct, so just use your best judgement. The most important thing to remember when you're buying a steel is that its full length is smooth or has grooves that run the length of it. A bumpy steel will not make your knife sharper.
Here's how to use a steel:
Now, there's one exception to the steel being solely for honing and not for sharpening. They're called diamond steels and they have diamond dust along the length. They're also magnetic, so they both sharpen and hone your knife at the same time. I should also mention that they're on the higher end of the price range for these.
Coffee Mugs $1 - $10
Okay, so we've gone over sharpeners and you might be considering buying one, but you might also be thinking that you can't afford one for a couple of months. That's fine, no one's expecting you to run out immediately anyway. You might want to look on craigslist and in garage sales while you're saving up to see if you can find one cheaper.
In the meantime, you might have a knife go dull because they do that. Here's a quick fix that takes more work than crock sticks and electric sharpeners, but will get the job done. Turn a coffee mug over and feel the bottom edge. Feel how it's rough? It's made of the same stuff that a crock stick is, just less refined. You can use the bottom edge of the coffee mug as a sharpening stone until you save up the money to buy one.
As with the sharpening stones mentioned before, position your blade at 10º to 20º to the edge of the mug and draw the blade across several times then turn it over and repeat that. Here's how it'll look.
I think that a knife sharpener is one of the best things you can get for your kitchen. It'll keep your knives sharp and safe and make your cooking so much easier in the process. If you're having a hard time saving up for one, remember one when someone asks you what you want for your birthday or Christmas, and keep your eye out for helpful garage sales. When buying a non-electric sharpener used, there's literally only one thing to remember - make sure it's not broken. Broken crock sticks or sharpening stones will not sharpen anything.
Remember that the non-electric sharpeners will take practice. As I tell my daughter, "Nothing worth doing is ever easy or comes without practice."
What kind of knife sharpener do you have? What do you like about it? What's hard? Questions? Comments? Tweet to @cookingcheap