If you think that my rants on food are insane, I know how you feel. There are several types of food that people say are awful that I think they're crazy for thinking that (I'm going to talk about one next week, in fact). As I've mentioned in my previous two installments of "HOLY CRAP DON'T EAT THAT" is that the foods I'm talking about are not, in and of themselves bad. However, they've been embraced by the food industry as cheap, easy ways to either make the food taste better to the American palette or boost the nutritional content of a food and have, therefore, been put in everything. Corn syrup and salt have been added to make poor quality food taste better, and our health has suffered because of it. Soy has been added because it has protein in it. At some point, food manufacturers discovered that items that have added protein can have their prices increased, so here we are with tons of food with soy flour, soy lecithin, soybean oil, etc.
Soy beans are the food equivalent of bamboo. They grow quickly, they're hardy, and they recover (grow back) quickly. They can also be used in a metric ton of stuff. Soy can be used to replace petroleum oil in everything from plastic to the rubber in tires. Seriously, except for gasoline (they're still working on it), if you can make it out of petroleum, you can make it out of soybean oil. This stuff is a freaking miracle. So why do I try to refuse to put it in my body?
Here's the part where I sound crazy then I'll back up and explain myself. If you are female or have a female of any age in your house you should seriously consider burning everything with soy in it. BURN IT. I'm not kidding. If you are the miraculous single dad that has 3 boys, well, this isn't such a concern, but you might want to pay attention if you ever plan to have a woman eat at your house again.
Before we started using soy in literally everything we put into our bodies, it had one major use - estrogen replacement. See, soy has what's called a phytoestrogen, or plant estrogen. For those of you who skipped biology class, estrogen is the group of primary sex hormones for females of all species. They create breasts, increase fat stores, stimulate uterine lining growth, reduce calcium absorption in bones, and stimulate ovulation among like 50 other things. In short, estrogen makes girls become women and women to become fertile. That seems great at the surface.
In fact, there's evidence that small amounts of plant estrogen before and during puberty can reduce the chance of breast and prostate cancer when children reach adulthood. There's also evidence that once a woman has had breast cancer and gone into remission, taking small amounts of plant estrogen can increase a woman's chance of staying in remission. Again, great and wonderful concepts.
So, why don't I eat soy and recommend that every woman burn all of the soy additives in her house? Because we, as Americans do not eat a small amount of soy. If you eat processed foods at all, you eat soy all the time every day. Most fast food burgers have soy in the bun, soy fillers in the burger, and soybean oil on the grill that it's cooked on. Then you have the french fries powdered with soy flour then deep fried in soybean oil. Even if you order the salad, your salad dressing's most likely made with soybean oil. In fact, the only thing I can think of that wouldn't have any soy in it at a fast food restaurant is the sodas. I'm not convinced it's not there somewhere, but it isn't in the ingredients.
Remember all those things I mentioned that soy does for women? Imagine enhancing them every time you eat anything. Your breasts will get bigger (happy time for men, but sad time for your back). Your fat stores will increase (insert screams here). Your bones will absorb much less calcium (broken hips anyone?). Then we get to the really scary stuff: It thickens your uterine lining and stimulates ovulation. Want to know a way to instantly increase your menstrual cramps? Thicken your uterine lining! Yay! Want to know a way to create pain between menstrual cycles? Stimulate ovulation too much. Double yay!
My family has a history of polycystic ovarian syndrome. That means we're prone to getting tons of cysts on our ovaries. These cysts hurt like words I've promised myself I won't say on this blog. Let's just say that I have never been stabbed in my sides, but I think I know how it'd feel. Guess what ovulation stimulation does? It creates more freaking cysts! Yeah, really, when I'm really, really careful about my soy intake, the knife-like pain in my lady parts decreases exponentially. I often wonder how many women are out there experiencing this pain and not knowing why.
Okay, so we know what excess estrogen can do to a woman, but what's the problem, right? Our bodies are programmed to change the amount of estrogen in our bodies to be less or more depending on our environment, right? Right. Kinda.
See, every woman's body comes equipped with a switch in her brain to stop producing estrogens when they get to a certain concentration. So, we shouldn't often have too much estrogen, right? Wrong.
The problem is that in addition to giving us an estrogen boost, soy goes up and disables that switch. That means, when you have an excess of estrogen, your body can't stop producing it. It just keeps making more and more and more.
So, now we have a situation where you're producing estrogen naturally, adding to your natural estrogen with a natural plant estrogen, and now a body that can't stop producing your natural estrogen. Oh, and did I mention that the fat that the estrogen creates stores estrogen in it which means you're now toxic with it? It does.
Doesn't that seem like it's going to lead to a bad situation? It does. Excess soy leads to excess weight gain, increased menstrual pain, and even infertility. I've read journal articles about the dangers of soy, and I can't figure out why it's still on the market and in every freaking thing I can buy. My only answer is that it must be a capitalism thing where the food manufacturers have discovered how much money they can make off of it, and refuse to let it be taken off the market. After all, they all say those convenience foods shouldn't be eaten as much as they obviously are. Yeah, that's happening, guys.
So, if you want the women in your life (including you, if you're female) to be healthy, I highly recommend eschewing soy. That means, to begin with, substituting canola oil for vegetable oil (that's actually soybean oil, kids) then start reading your freaking labels. Soy lecithin makes fats coagulate with your food easier. Gee that seems healthy. Give us more hormones that we can handle and blend fats into our food. Add in soy milk, soy flour, soy grits, soy meal, and soy sauce and you have a huge list of what you shouldn't be eating.
If you want an easy way to know if you have soy in your food, skip right to the bottom where all food products are now required to put allergy information and see what's listed there. If soy's there, put it down. Then write a letter and scream at the company. The only way to stop manufacturers from using this as an additive is to stop giving them monetary benefits from doing so.
Sunday, July 29, 2012
Saturday, July 28, 2012
Your Weekly Frugal Recipe - Chicken Enchiladas
Chicken Enchiladas
The Food Stamp Way
| Skills | Prep | Cook | ||||||
|---|---|---|---|---|---|---|---|---|
|
|
| ||||||


This is another one of those recipes that you might need to plan to make ahead of time. It takes a little more time than a lot of people like, but it shouldn't take more than about 25-30 minutes of prep and 25 minutes of cooking time. I've made this ahead of time and stuck it in the fridge to bake later.
The main reason I love this recipe is I don't like to have to take the time to roll my ingredients into each tortilla separately, put them in a pan and then put sauce over them and bake. This is made in a casserole method, but when you cut it into pieces, most people don't know the difference between this and the individually rolled enchiladas.
The main reason I love this recipe is I don't like to have to take the time to roll my ingredients into each tortilla separately, put them in a pan and then put sauce over them and bake. This is made in a casserole method, but when you cut it into pieces, most people don't know the difference between this and the individually rolled enchiladas.
| Equipment you'll need |
|---|
| Skillet, blender or food processor, 11x7 baking dish, saucepan, whisk, knife, cutting board |
| Ingredient | Amount | Cost |
|---|---|---|
| Corn tortillas | 12 | $0.43* |
| Medium onion | 1 | $0.50 |
| Canola oil | 1 oz | $0.06* |
| Shredded Monterey Jack | 1 lb | $4.23 |
| Chicken | 1 lb | $2.28 |
| Butter | 1/4 c. | $0.34* |
| Flour | 1/4 c. | $0.03* |
| Chicken Broth | 2 c. | $0.78 |
| Sour cream | 8 oz | $0.96 |
| Poblano pepper | 1 | $0.50 |
| Fresh cilantro | 1/4 bunch | $0.14* |
| Total | $10.25 | |
| * Based on price per package divided by amount used. | ||
| The poblano pepper has to be roasted. If you're not comfortable with this, you can pick up a 4 oz can of chopped chiles for roughly the same price. |
| You have to use fresh cilantro for this recipe - no substitutions. |
| Chop the onion into medium-size pieces. |
| Cut the chicken into medium-sized pieces. Heat the vegetable oil over a medium flame and cook the chicken and onion in it. If you have it, sprinkle some cumin over the raw chicken. |
| Roast the poblano pepper under your broiler for about 5 minutes and skin it. Put the pepper, cilantro, and chicken broth into a blender or food processor and blend until smooth. |
Instructions:
2. Melt the butter in a saucepan and whisk the flour into it and allow it to cook until it starts to froth.
3. Add the chicken broth mixture to the flour and butter and whisk together quickly. Allow to simmer.
4. Add the sour cream to the sauce whisk everything together.
5. Grease a pan with cooking spray or a little canola oil. Cover the bottom of the pan with a third of the sauce.
6. Top the sauce with 6 corn tortillas, allowing them to overlap to cover all the sauce completely.
7. Cover the tortillas with all of your chicken pieces.
8. Cover the chicken with about half of the cheese.
9. Cover the cheese with a third of the sauce.
10. Cover the sauce with another layer of tortillas.
11. Cover the tortillas with the last of the sauce.
12. Cover the pan with aluminum foil with the shiny side pointed toward the food.
13. Bake at 425º for 20 minutes.
14. Remove the aluminum foil and sprinkle the rest of the cheese over the top. Replace in the oven and bake for 5 minutes or until the cheese is completely melted.
What recipe would you like done the food stamp way? Comments? Questions? Tweet to @cookingcheap
Friday, July 27, 2012
Luxuries - Fresh herbs
I'm sure that after last week's post you were certain that I was finished with herbs. Sorry, but not quite. We're close to being done with them, though. I promise. The only reason I'm writing a separate entry about fresh herbs is because I can't count how many recipes I've seen that say "fresh thyme" or the like, and for a long time, I didn't know when it was okay to substitute dry spices or, for that matter, how you did it.
The issue with the dried herbs that are far preferred by most people because of their longevity is that, once you remove all the water out of an herb, it's flavor becomes incredibly enhanced. I don't really know why that is, but it's true. If you ever get a chance to chew on a single leaf of fresh rosemary then on a single leaf of dried rosemary, you'll see that the flavor is much more intense in the dried version. For that reason, you can't substitute 1 tsp of dried thyme for 1 tsp of fresh thyme or you'll have a dish that people say, "Wow, that's a lot of thyme!" about. By the way, if you have people in your house that can identify thyme, I'm really impressed.
There are also situations that you just can't substitute the dried version for the fresh version. For example, bruschetta, a tomato-basil topping to bread, would taste awful if you sprinkled dried basil over it. That's because you'd just get hard flakes in parts and it would be too strong.
That being said, if you're lucky enough to have an herb garden, or at least a couple of herbs growing fresh, you can always substitute fresh for dried. Always. Even though they're less intense, there's no reason to not use them because your recipe asks for dried oregano.
Here are the four rules of dried-fresh substitution:
When to leave it fresh
Like I just mentioned, there are dishes you can't substitute dried for fresh. These are dishes that the herbs will not be cooked and softened in the process. With the exception of powdered sage and/or garlic, uncooked dishes require fresh herbs. They lend a light crispness to the dish that, for some reason, tastes like summer. That's why we serve fresh vegetables in the summer, because they're so refreshing. For raw salads, toppings, and decoration, fresh herbs are the only way to go.
When to substitute
When you're making pretty much any cooked dish, you can straight up substitute dried herbs for fresh herbs. That's because, in a cooked dish, any herb, dried or fresh, is going to have its flavor leeched out and spread through the whole dish. When you have a recipe calling for fresh herbs and you only have dried, use half of the amount that the recipe calls for. For example, if your recipe says "1 tsp fresh thyme" put in 1/2 tsp dried thyme. This rule goes in reverse for people who have fresh herbs on hand. Double the amount in the recipe, if it's asking for dried. So your 1 tsp of dried oregano becomes 2 tsp of fresh oregano. If your recipe doesn't specify fresh or dried, I always assume dried. It's worked so far.
When to rehydrate
This is the in between stage of substitution and leaving the herbs fresh. In the rare case that you have a dish that you know you need a softer herb, but it isn't necessarily fresh, you can rehydrate the herbs. Like I said before, use half the amount in the recipe and put your herbs in water or oil for at least 30 minutes before you use them. Whether you use water or oil is dependent on the recipe.
For example, I make an herbed pasta that requires me to cook herbs in oil then toss pasta in it. I know that the pasta tastes tons better with fresh herbs, but I just can't go buy 6 types of fresh herbs every time I make it. That's because I always waste a lot, and I haven't been able to grow herbs successfully in the dry heat of Arizona. So, before I make it, I put all my herbs in the olive oil in which I will cook them and leave them for an hour. The oil softens the herbs and absorbs some of their flavor before I throw everything in the pan. I wouldn't use water for this because water and oil don't get along well.
Another great example would be making a dip. If you wanted to make a dill dip, you might soak your dill in some water to soften up the herb before adding it to the sour cream. In this case, you would want to pour your water and dill through a fine mesh sieve to get rid of the water before adding it to the sour cream.
When to make tea
I realize that seems like a weird option here, but it's not really. See, there are a few times that I want the herb, but I don't want to see the leaves in what I'm making because they'd just create a patch that was really strong, and I want my dishes to have a even flavor throughout. In these cases, I use a liquid ingredient in the recipe, heat it up, and put my herbs, fresh or dried, into it. Then I leave it for 30 to 45 minutes.
While it sits, the herb does the same thing a tea bag does, releases its flavor into the liquid. Then I put a sieve over my dish and pour my liquid directly into the dish while removing the leaves. The result is a beautifully soft, even flavor that resonates with the dish.
The most common place I do this is in rosemary mashed potatoes. No one likes lumps in their potatoes, and they like leaves of rosemary even less, especially when one goes down the wrong way. However, almost everyone loves rosemary mashed potatoes. When I'm getting ready to mash my potatoes, I heat the cream I'm going to use and put a couple of pinches of rosemary into it. Then I leave it while I get the potatoes mashed up. Once it's sat there for a while, I pour the cream, now infused with the rosemary flavor, into the potatoes. This makes the whole dish resonate with rosemary and makes it scrumptious.
You can do this with fudge to infuse a flavor into the dish or with water to put into a soup. It's also worth mentioning that this is the only way to get flavor out of saffron.
Thursday, July 26, 2012
Techniques - Peeling
I really thought about dedicating an equipment section just to what kind of peeler you should get, but I realized that we have five different peelers and they all work equally well. Really, you can buy a peeler from the dollar store and it'll work just as well as the one you get for $20 from Willams Sonoma. Yeah, you might have to replace it after a few years (like 5), but you can buy an other $1 peeler and move on. It's not going to make a huge difference.
Peeling is one of those things that is only rarely necessary and most people consider it messy because, if you do it wrong, it is. I could make a crack about how I'm well associated with potato peeling because I was in the Army, but truth be told, they didn't do that by the time I got there. I have, however, peeled all kinds of different things both with peelers and paring knives. I highly recommend peelers, if given a choice.
That being said, peeling is only really necessary about 10% of the time. Items we used to peel (potatoes, carrots, apples, etc) have been found to store a large amount of their nutrients in their peels. It's worth mentioning that every single adult in my life told me that before there was scientific evidence to prove it. Therefore, we really don't need to peel that much. I peel sweet potatoes, if I'm making a sweet potato casserole, but not much more. For that reason, the video at the end of this is of me peeling sweet potatoes.
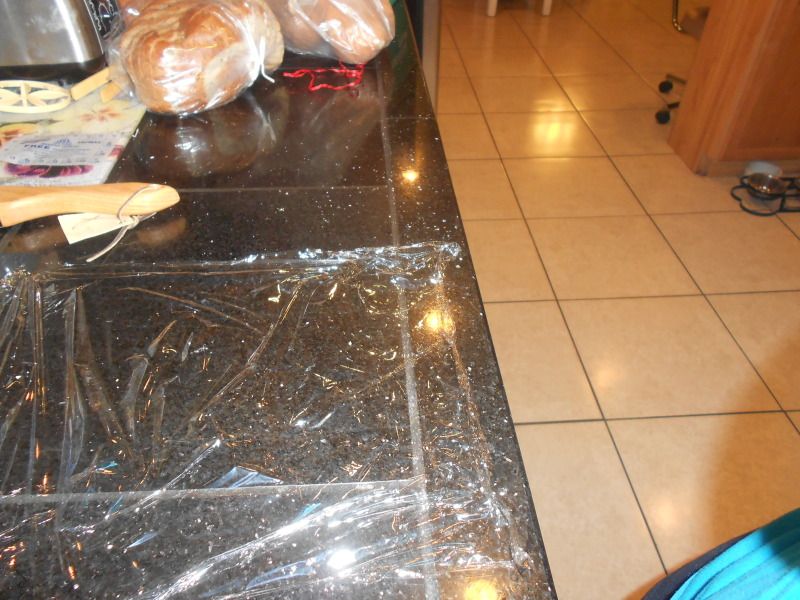
Peeling is fast and easy, and there's probably a lot of people who are skipping this entry because they rolled their eyes and thought it was dumb. There's only one little trick I'm going to share with you before I let you go: plastic wrap.
Plastic wrap is what's going to keep you from making a horrible mess of your kitchen. I remember when I started peeling, I was pretty young and almost the whole counter got covered with peels in the process. Yes, this is one of those techniques you get to teach your kids to do while you're cutting up vegetables (my daughter cuts up vegetables too, but she's been working in the kitchen with me for 2 years). It's the simplest thing in the world, really.
So, here's how to peel something without it getting everywhere.
1. Cover your work area with saran wrap, completely.
 2. Press firmly on your vegetable with your peeler. You shouldn't need to worry about smashing the vegetable because you only do this with hard veggies like potatoes and zucchini.
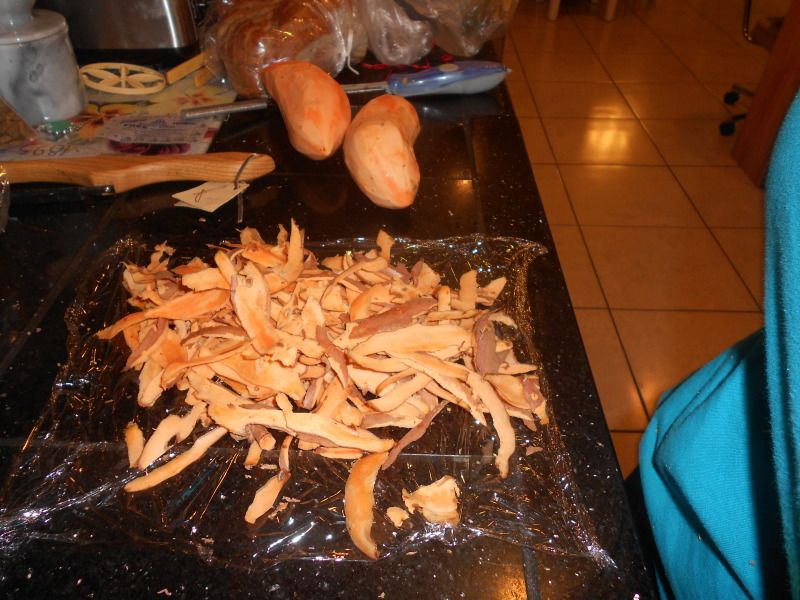
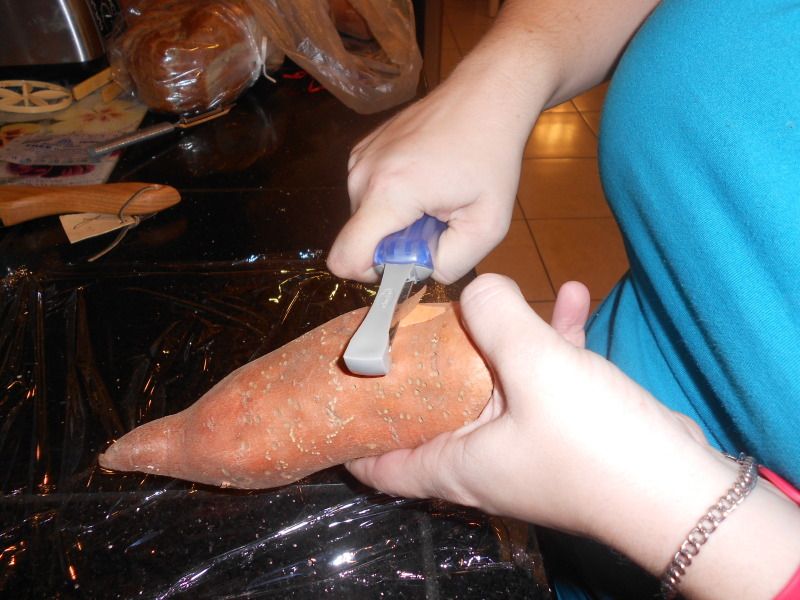 3. Slowly, with long strokes, push the peeler down the length of the vegetable, rotating the vegetable as you need to reach more peel. Do this slowly so you keep your peels on the saran wrap.
4. Peel all the vegetables you need, keeping the peelings on the saran wrap. If you miss, just pick the pieces up and put them back on the wrap.
 5. Pick up the four corners of your saran wrap and roll it into a ball with the peels inside.
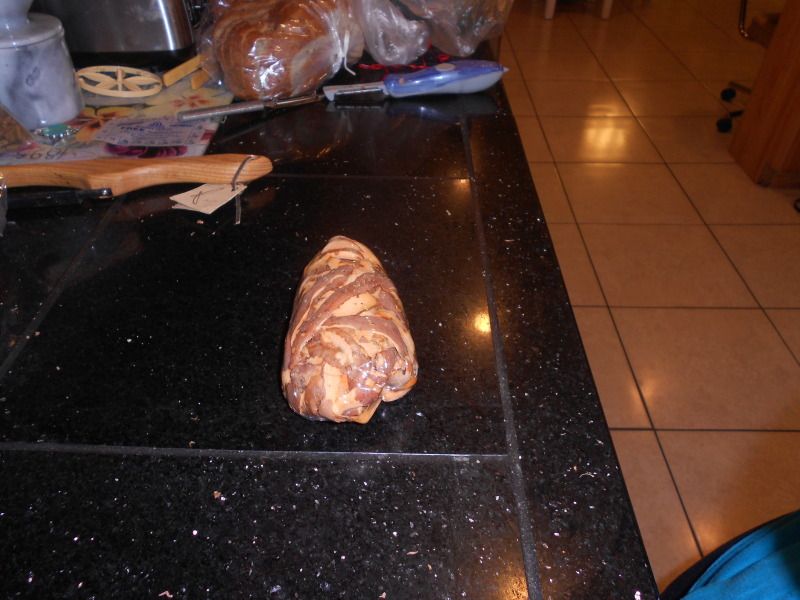 6. Throw the saran-wrapped peels away. You now have a clean counter and don't have to bring the trash can over to get a thousand pieces of peel off of it!
Did this save you time and mess? What do you want to learn to do? Tweet to @cookingcheap
Peeling is one of those things that is only rarely necessary and most people consider it messy because, if you do it wrong, it is. I could make a crack about how I'm well associated with potato peeling because I was in the Army, but truth be told, they didn't do that by the time I got there. I have, however, peeled all kinds of different things both with peelers and paring knives. I highly recommend peelers, if given a choice.
That being said, peeling is only really necessary about 10% of the time. Items we used to peel (potatoes, carrots, apples, etc) have been found to store a large amount of their nutrients in their peels. It's worth mentioning that every single adult in my life told me that before there was scientific evidence to prove it. Therefore, we really don't need to peel that much. I peel sweet potatoes, if I'm making a sweet potato casserole, but not much more. For that reason, the video at the end of this is of me peeling sweet potatoes.
Peeling is fast and easy, and there's probably a lot of people who are skipping this entry because they rolled their eyes and thought it was dumb. There's only one little trick I'm going to share with you before I let you go: plastic wrap.
Plastic wrap is what's going to keep you from making a horrible mess of your kitchen. I remember when I started peeling, I was pretty young and almost the whole counter got covered with peels in the process. Yes, this is one of those techniques you get to teach your kids to do while you're cutting up vegetables (my daughter cuts up vegetables too, but she's been working in the kitchen with me for 2 years). It's the simplest thing in the world, really.
So, here's how to peel something without it getting everywhere.
1. Cover your work area with saran wrap, completely.
Did this save you time and mess? What do you want to learn to do? Tweet to @cookingcheap
Wednesday, July 25, 2012
Equipment - Knife Sharpeners
Knife sharpeners may seem like a frivolous expense to most people, and I completely understand that. Sharpeners are something that most people don't know how to use, don't know what to get, and/or seem expensive. However, I say that a knife sharpener is one of the very basic things you need in your kitchen. Right after you've bought a decent knife and a cutting board, you absolutely need a knife sharpener to keep your knife useable. See, your knife starts going dull as soon as you start using it. First you won't be able to cut tomatoes, then fruits, then vegetables, and the next thing you know, you've cut your thumb while trying to muscle your way through a chicken breast.
Remember when I said a dull knife is the most dangerous knife? It's absolutely true, and the lesser the quality of your knife, the more it will go dull. The question is, is it worth it to cut your hand open often to avoid buying a sharpener? I guarantee buying a sharpener is cheaper than a hospital visit to stitch up your hand. I also guarantee that it's cheaper than buying a new knife every time yours gets dull.
There are three types of sharpeners I want to discuss: Crock sticks, stones, and electric, but before that, I want to tell you about an experience I had last week. See, we have at least 3 different sharpeners in our kitchen, but I had seen these commercials for a $15 sharpener on television and I was curious if they worked. I figured that, if one of those would work for you, then you wouldn't have to be as concerned about price. Everyone can put away $7 a month for 2 months to prevent a hospital trip, in my opinion. So, I went to Wal-Mart in their "As Seen on TV" section and bought this:
 I have a lot of experience with different kinds of sharpeners, so I took it home and my dad and I gave it a try. We found the dullest knife in our kitchen - the one that wouldn't cut a tomato (you need a razor's edge on a knife to cut a tomato without squishing it) and ran it through this "miracle product" several times. The blade would not cut the tomato. So, next, we found a blade that would cut the tomato and ran it through the Samurai Pro. The knife would no longer cut the tomato.
In my opinion, that pretty much sums up my opinion about the $15 knife sharpener that you can get on the "As Seen on TV" section of different mega stores. I think that if you buy this, you not only won't get sharp knives, you'll probably end up dulling the ones you have, rendering them more dangerous.
Anyway, on to sharpeners I believe work. As I said before, there are three types of sharpeners I'm going to talk about and at the end I'm going to throw in a paragraph or two about steels as well as a paragraph about using what you have in your kitchen to do the same thing (but it's a little advanced).
Let's start with the basics - why does your knife get dull? Well, it has to do with a lot of different things. First, the amount you use your knife, will, of course, get more dull the more you use it. This is because it wears down as you use it, just like the tires on your car and the soles on your shoes. Logic dictates that, the more you cook, the more you'll use your knife and the more it'll go dull. Second, the type of cutting board, or lack thereof, can have an impact on your knife's sharpness. According to wood cutting board lovers, the blade of your knife can slide through wood grain at a molecular level which prevents dulling while plastic cutting boards press on the edge and dull it. However, my opinion is that you can take that money you saved by buying a plastic board instead of a wood board and use it to buy one of these sharpeners. Finally, sometimes, your knife isn't always dull. Sometimes, it just needs to be honed. The difference is that, when you sharpen a knife, you actually take a little bit of metal off the knife. If you sharpen too much, at a coarse grit, you'll wear away at the knife. Alternatively, honing a knife re-aligns the metal molecules and makes your knife sharper by comparison. There are two options on this list that both sharpen and hone your knife to reduce wear and tear on your knives.
Crock Sticks $10 - $55
 Crock sticks are ceramic rods that are (usually) positioned at a 45º angle to one another while secured to a wooden or metal base. The ceramic has a grit that can either sharpen or hone your knife. A basic setup for one of these is about $20 to $25 and it comes with either medium or fine grit sticks. A medium grit stick will actually sharpen your knife while a fine grit will hone your knife.
The nice thing about these is that you can buy sticks with different grits for about $5. That means that if you buy a set that has one grit, you can get another grit for relatively cheap. Sets that come with three different types of sticks go for about $55 and you can buy the sticks on their own for $10.
The only problem with crock sticks is that finding them is often difficult. You won't find them in a cooking store, nor will you find them in the cooking tools area of your local store. In fact, I can only find them in sporting goods stores. That's because most stores assume that the only time you'd choose to use this method of sharpening is when you're cooking. However, my dad uses it at least once a week. Here's how to use a set of crock sticks like the ones above.
Stones $10 - $75
Sharpening stones come in two types: wet and oil. They also come in multiple grits, coarse, medium and fine. If you're going to get a stone, buy at least a medium and a fine. The fine is for your regular honing while the coarse and medium are actually for sharpening. The only difference between the two types is what they need to be whetted with. If you can't figure that out, oil stones are whetted with mineral oil and wet stones with water. The very basic stones are $10 for each stone while a tri-stone with 3 sides and grits goes for between $50 and $75, depending on where you find it.
One important thing to remember if you do use an oil stone is to get some mineral oil from the pharmacy to use as the oil. Food-based oils go rancid and make your stone stink.
Here's how you use a sharpening stone:
Electric sharpeners $20 - $400
 There are two distinct positive sides to electric knife sharpeners: First, you can find an electric knife sharpener any-freaking-where. I mean, they're in the cooking aisle in every major "super" store. Second, they are seriously the easiest thing on this list to use. You put the blade in the sharpener's slit and pull it toward you and voila you have a sharp blade! There's no learning curve; there are no angles to remember; and there's no repetition.
Now that you've read that, you may wonder why I don't have an electric knife sharpener. The fact is, that though they have the largest range of prices on this range, they also have the largest range of reliability. See, electric knife sharpeners are kind of like the diet programs of the cooking market. There are some that work just fine, and they cost a lot. There are also very many that either don't work or work very poorly and don't cost nearly as much. Both of them have a cost that could be prevented with hard work, or practice in sharpeners' case.
The major problem I have with even the best electric sharpeners is that they only sharpen your blade. There's no honing with an electric sharpener which means that every time you use one, it's taking a little bit of metal off your blade. That means that, eventually, you're going to wear through the blade of the knife and have to replace it. If you press down on the blade while you're using one of these sharpeners, you can cause the blade to wear out too quickly as well.
If you decide to buy an electric sharpener, do yourself a favor and do your homework. Go to the stores you frequent and write down the brands and types of sharpeners they have (I always have a notebook with me) then go home and search for reviews for those sharpeners on the internet. I have good luck entering something like "Presto 08800 knife sharpener reviews" and I'll get a few different sites. Read the good and the bad on several websites and draw an opinion from those reviews.
Steels $15 - $180
 Steels are one of those things that come with knife kit that many people don't really understand. They're dedicated to honing your knife, not sharpening it. The thing with a sharpening steel is that it aligns the edge of your knife so that it seems sharper. Most chefs use a steel once a day, at the beginning of cooking. When you're only doing major prep work once a day, you can probably get away with doing it once or twice a week.
When I was in school, I was told that steels work by being magnetized and pulling the metal to one side or the other. My father's steel isn't magnetized in any way, shape or form. I can't find anything on the internet that says which way is correct, so just use your best judgement. The most important thing to remember when you're buying a steel is that its full length is smooth or has grooves that run the length of it. A bumpy steel will not make your knife sharper.
Here's how to use a steel:
Now, there's one exception to the steel being solely for honing and not for sharpening. They're called diamond steels and they have diamond dust along the length. They're also magnetic, so they both sharpen and hone your knife at the same time. I should also mention that they're on the higher end of the price range for these.
Coffee Mugs $1 - $10
Okay, so we've gone over sharpeners and you might be considering buying one, but you might also be thinking that you can't afford one for a couple of months. That's fine, no one's expecting you to run out immediately anyway. You might want to look on craigslist and in garage sales while you're saving up to see if you can find one cheaper.
In the meantime, you might have a knife go dull because they do that. Here's a quick fix that takes more work than crock sticks and electric sharpeners, but will get the job done. Turn a coffee mug over and feel the bottom edge. Feel how it's rough? It's made of the same stuff that a crock stick is, just less refined. You can use the bottom edge of the coffee mug as a sharpening stone until you save up the money to buy one.
As with the sharpening stones mentioned before, position your blade at 10º to 20º to the edge of the mug and draw the blade across several times then turn it over and repeat that. Here's how it'll look.
I think that a knife sharpener is one of the best things you can get for your kitchen. It'll keep your knives sharp and safe and make your cooking so much easier in the process. If you're having a hard time saving up for one, remember one when someone asks you what you want for your birthday or Christmas, and keep your eye out for helpful garage sales. When buying a non-electric sharpener used, there's literally only one thing to remember - make sure it's not broken. Broken crock sticks or sharpening stones will not sharpen anything.
Remember that the non-electric sharpeners will take practice. As I tell my daughter, "Nothing worth doing is ever easy or comes without practice."
What kind of knife sharpener do you have? What do you like about it? What's hard? Questions? Comments? Tweet to @cookingcheap
Tuesday, July 24, 2012
Planning - Frozen vs. Fresh vs. Canned part 1
Possibly one of the greatest misconceptions about cooking great food is that you must use things that are in the produce or butcher section of your grocery store. In short, it's believed that you can't use anything canned or frozen to make a good meal. I beg to differ. In many cases, frozen and canned foods are not only as good as fresh food, but are able to be kept indefinitely in your cabinet or freezer (choose wisely, haha). Now, I won't argue that fresh fruits, vegetables, and meats are the best, but I'm not sure where this belief that things can't be frozen and remain good. For goodness sake, I freeze the meat I buy to make it last longer, why can't manufacturers do the same? It's also worth mentioning that even some of the fresh foods you find in the grocery store might be of worse quality than what you find in the freezer section, so here I'm going to go over fresh, canned, and frozen fruits, vegetables, and meats so that you can determine what's best for your situation.
I was going to try to write this all in one week, but after I got started, it was so long, I just couldn't bear to subject you to the whole thing (you're welcome). So, this week, I'm doing fresh food. Next week, I'll either do canned or both canned and frozen.
Fresh:
The big issue with a lot of fresh foods is that they must be bought in season in order to keep them to our budget. That means you can only have certain items at a certain time of year before they start having to be shipped from Chile to get them. Nothing against Chile, but strawberries that are shipped from there are going to cost more than the ones that came from the farm up the road. I experienced my first organic food market when I lived in California, and it only sold fruits, vegetables, and meat from farms within 100 miles. For the longest time, I didn't understand what people were talking about when they said organic food cost more because those prices were the lowest in the town. You know why? because they didn't have to pay nearly as much in gas and transportation costs as did the grocery stores that were getting off season items from Mexico. If off-season items are on sale, the chance is pretty high that they're selling unripe food and expecting you to ripen it on your own.
The other problem with buying fresh produce and meat is that you can't store it like you can frozen and canned food. Like most of the things on this blog, fresh produce has no preservatives and will go bad within a week or less, depending on its ripeness. Now, with the meats, as I've already lined out, you can buy in bulk and freeze, but it's very rare that you can do the same with anything that didn't come out of the butcher's section. Trust me here, you can try to freeze your own fruits and vegetables, but it won't go well. That being said, if you want to write an article on home canning, email me and we'll talk.
Meat & Poultry:
Meat is one of those things that doesn't ever seem to go out of season. With the amount of meat storage that many manufacturers have now, we have access to all types of meat throughout the year. That being said, beef, pork, and chicken are pretty much immune to season prices. That means that the beef, pork, and chicken industries have good enough storage and high enough production rate that they never have to worry that they're going to run out.
When you're shopping for red meat, it may surprise you that it doesn't actually need to be red to be good. Most producers of meat use sodium nitrate to "fix" the color in the meat. That means that it actually dyes the meat red. The brighter the red on your meat, the more preservatives are in it. I like to try to find brown or pink meat because I don't like the idea of artificial colors. However, that's not usually fiscally responsible.
The basic rule of meat and poultry is that, if it's not green, it's fine to buy. My favorite section of the meat department is the "day old" section where they put the meat that's going to expire within the next two days. That stuff is about half the price of everything else, and as long as you either use it immediately or freeze it, it's fine for consumption.
Fish & Seafood:
Conversely, meat that comes out of the water has definite seasons. There are times you just can't find certain fishes and seafood in the fresh section of your grocery store, and even more times you can find it for an incredibly high price. It doesn't matter if its fresh or saltwater fish, there are certainly times that they're less expensive than the others. Most people don't spend the money on fish, but as I'm going to line out someday in Luxuries, they're really essential to your kids' brain development.
Some of the fish and seafood you'll see will say that it's never been frozen - not that important to me - but the thing I rely on most is the smell. You know that old saying "it smells fishy"? Well, fish should never "smell fishy" because that fishy smell is the release of ammonia from the dying carcass of the fish. Seriously, if your grocer's fish counter ever smells like that, walk away, quickly.
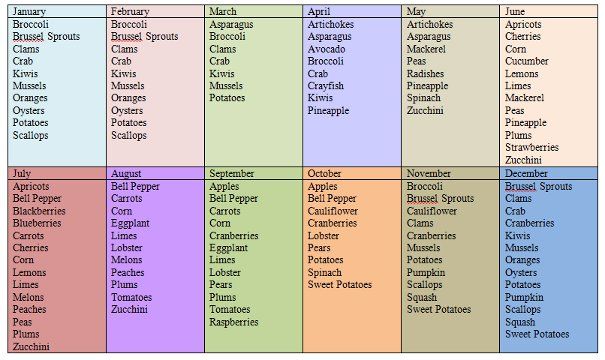
As far as shellfish goes, here's a quick and easy calendar you can click on and print to know when different seafoods are in season here in the U.S. and Canada. If you live in the UK, you can go to this site to make your own. All other countries, tweet me and tell me what your websites are and I'll add them too.
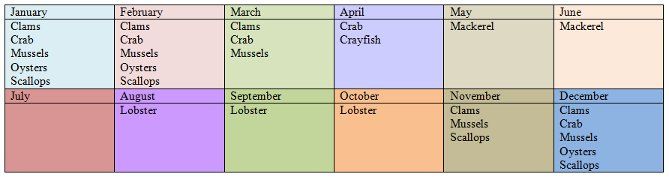 No, I'm not expecting you to go buy lobster, like ever, but it was included in the different types of seafood.
Vegetables:
I was going to try to write this all in one week, but after I got started, it was so long, I just couldn't bear to subject you to the whole thing (you're welcome). So, this week, I'm doing fresh food. Next week, I'll either do canned or both canned and frozen.
Fresh:
The big issue with a lot of fresh foods is that they must be bought in season in order to keep them to our budget. That means you can only have certain items at a certain time of year before they start having to be shipped from Chile to get them. Nothing against Chile, but strawberries that are shipped from there are going to cost more than the ones that came from the farm up the road. I experienced my first organic food market when I lived in California, and it only sold fruits, vegetables, and meat from farms within 100 miles. For the longest time, I didn't understand what people were talking about when they said organic food cost more because those prices were the lowest in the town. You know why? because they didn't have to pay nearly as much in gas and transportation costs as did the grocery stores that were getting off season items from Mexico. If off-season items are on sale, the chance is pretty high that they're selling unripe food and expecting you to ripen it on your own.
The other problem with buying fresh produce and meat is that you can't store it like you can frozen and canned food. Like most of the things on this blog, fresh produce has no preservatives and will go bad within a week or less, depending on its ripeness. Now, with the meats, as I've already lined out, you can buy in bulk and freeze, but it's very rare that you can do the same with anything that didn't come out of the butcher's section. Trust me here, you can try to freeze your own fruits and vegetables, but it won't go well. That being said, if you want to write an article on home canning, email me and we'll talk.
Meat & Poultry:
Meat is one of those things that doesn't ever seem to go out of season. With the amount of meat storage that many manufacturers have now, we have access to all types of meat throughout the year. That being said, beef, pork, and chicken are pretty much immune to season prices. That means that the beef, pork, and chicken industries have good enough storage and high enough production rate that they never have to worry that they're going to run out.
When you're shopping for red meat, it may surprise you that it doesn't actually need to be red to be good. Most producers of meat use sodium nitrate to "fix" the color in the meat. That means that it actually dyes the meat red. The brighter the red on your meat, the more preservatives are in it. I like to try to find brown or pink meat because I don't like the idea of artificial colors. However, that's not usually fiscally responsible.
The basic rule of meat and poultry is that, if it's not green, it's fine to buy. My favorite section of the meat department is the "day old" section where they put the meat that's going to expire within the next two days. That stuff is about half the price of everything else, and as long as you either use it immediately or freeze it, it's fine for consumption.
Fish & Seafood:
Conversely, meat that comes out of the water has definite seasons. There are times you just can't find certain fishes and seafood in the fresh section of your grocery store, and even more times you can find it for an incredibly high price. It doesn't matter if its fresh or saltwater fish, there are certainly times that they're less expensive than the others. Most people don't spend the money on fish, but as I'm going to line out someday in Luxuries, they're really essential to your kids' brain development.
Some of the fish and seafood you'll see will say that it's never been frozen - not that important to me - but the thing I rely on most is the smell. You know that old saying "it smells fishy"? Well, fish should never "smell fishy" because that fishy smell is the release of ammonia from the dying carcass of the fish. Seriously, if your grocer's fish counter ever smells like that, walk away, quickly.
As far as shellfish goes, here's a quick and easy calendar you can click on and print to know when different seafoods are in season here in the U.S. and Canada. If you live in the UK, you can go to this site to make your own. All other countries, tweet me and tell me what your websites are and I'll add them too.
Vegetables:
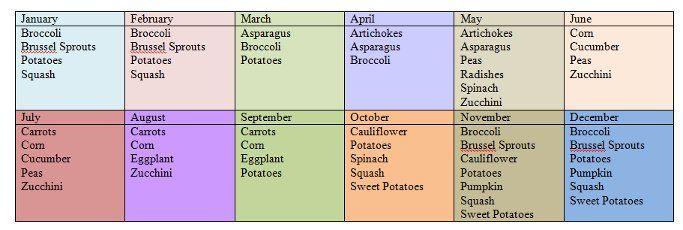
Vegetables are tricky. There are some that never seem to go out of season and there are others that you can never find on sale. Some of them will never be in your grocer's frozen or canned sections (lettuce), some of them, you can't find anywhere else (palm hearts). Vegetables are far more hardy than fruits, so they'll stay good longer. When you're looking at vegetables that are on sale, ask the store's produce guy how to tell if an item is ripe or not before you buy it. Well, you can do that or use a smart phone to search the internet. The produce guys in my grocery stores always know, and sometimes the store puts a guide to buying ripe vegetables on the signs.
Now, that's not anywhere near all the vegetables that you could possibly find. If you want a full, comprehensive list for the US, look here.
Fruits:
Fruits are delicate, to say the least. When you buy a ripe peach, you're lucky to get through 2 whole days before it starts to rot. If you buy an unripe fruit and ripen it yourself, you won't get the same taste as a tree or vine ripened of the same variety. Further, some vegetables will never taste right, if your store or you don't treat them right. A perfect example of that is the tomato. Did you know refrigeration stops the ripening process of tomatoes? That means that, if your grocery store transports its fruits and vegetables in a refrigerated truck, you will never get a ripe tomato from the produce section. Depending on where you live, those types of fruits might be best bought canned or frozen.
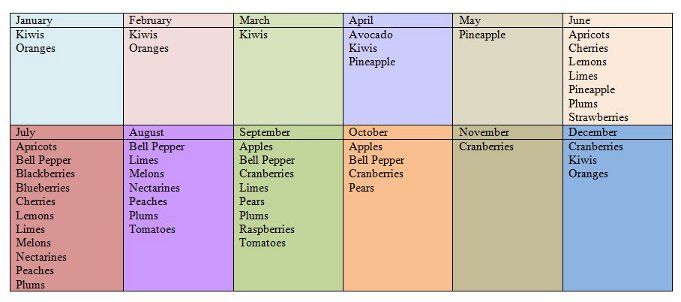
I don't know how your brain works, whether you prefer to have these in categories, or all at once, but while I made the lists, I kept a comprehensive list going in alphabetical order. You can just print this one:
All of that information was obtained through this site, but I thought it'd be easier for you to see it put together like that. You can always visit here to see what's in season this week.
If you'd like to get some inexpensive vegetables that are in season where you are, you should check out sites like bountifulbaskets.org that provide low-cost fresh vegetables from local farmers. We've done that a few times and have always had a great time trying to figure out what dishes we were going to make from 2 heads of cauliflower and an eggplant.
Monday, July 23, 2012
A War on Convenience Food - Snacks part 1
Before you get frightened that I'm going to have an unbroken string of snacks, I'm not. I just thought that the majority of the money that we spend on pre-made stuff is the stuff we keep in our cupboards and give our kids when they need a snack. You know what I'm talking about: cereal bars, crackers, cookies, etc. I'm going to do several parts on snacks that we buy, but I'm not going to do them all at once. Instead, I'm going to split them up and do one every few weeks with other convenience foods mixed in.
When my daughter comes home from school or gymnastics and says to me, "Mommy, they're allowing us to have snacks now, but only healthy ones," I want to punch a wall. Though I totally agree that schools should allow kids a snack when they're hungry, the first question that always jumps to my mind is, "What's healthy?"
It's a valid question. There are "health foods" on our shelves with corn syrup, chocolate, and salt packed into them as well as people who will assume that anything that looks like health food is healthy. Do I go buy one of those cereal bars that are packed with marshmallow creme? Do I send her with trail mix that most likely has M&Ms in it and risk some kid with nut allergies getting ahold of it? Is this one of those people that considers popcorn healthy? (Note: The last school teacher was) Apple slices go brown and soggy unless you put lemon juice on them, then they taste like lemons. Whole fruit takes too long to eat and makes a lot of noise and/or mess. Worst of all, if I make a bag of carrots and my daughter forgets about them, I find a baggie of brown goo at the bottom of her backpack a month later. Gross.
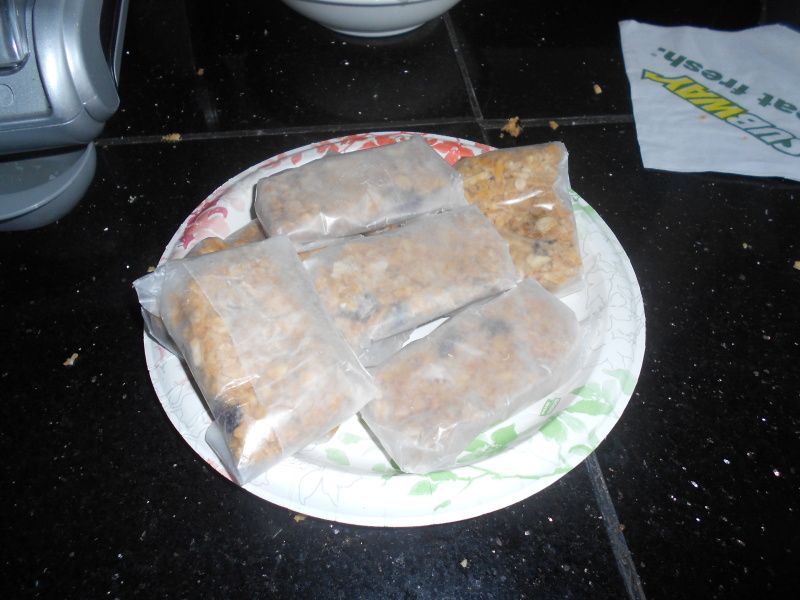
I like the idea of energy bars, but I have a difficult time finding any of them that my daughter will eat that aren't packed with chocolate and corn syrup and soy (I'm really going to talk about that soon) as well as about four other kinds of syrups I've never heard about. Heck, Fiber One bars have both Corn Syrup and High Maltose Corn Syrup listed in their ingredients, and they're haled as incredibly healthy. (Maltose is a more complex sugar than fructose, but it's still not great.) They're also covered in chocolate 90% of the time. Add the fact that they're store-bought, non-fresh food to the mix, and you have a combination of things I think I can do better.
So, I went down to my local grocery store and stood in the "convenience breakfast" aisle with my magic notebook of prices and wrote down the price of every different brand of energy bars that are made without fruit in the middle or marshmallow creme. In other words, I looked at the "healthy" bars. They ranged in price from $2.50 for 8 bars (31¢ each) to $3.99 for 5 bars (80¢ each). I also should mention that the low end bar had three different types of corn syrup (corn syrup, low fructose corn syrup, and high fructose corn syrup). Admittedly, the more expensive the bars, the better the ingredients, but I still don't know what they all are.
So, I did some research and I made my daughter her own energy bars that are endlessly customizable for your family. In the notes about ingredients section, I'll tell you some substitutions that you can use to make these work for you. I'm putting those in because there's no telling if you have family members allergic to peanuts or tree nuts or if you're vegan. I have some options for those.
| Equipment you'll need |
|---|
| Saucepan, cookie sheet, 13"x9" pan, mixing bowl, rubber spatula |
| Ingredient | Amount | Cost |
|---|---|---|
| Peanut butter | 1/2 c. | $0.43* |
| Honey | 1/2 c. | $1.39* |
| Oatmeal | 1 c. | $0.18* |
| Puffed Rice Cereal | 1 c. | $0.66* |
| Slivered Almonds | 1/2 c. | $1.60* |
| Raisins | 1/3 c. | $0.72* |
| Total | $4.98 | |
| * Based on price per package divided by amount used. | ||
| If you're allergic to peanuts, you can substitute almond butter. If you're allergic to both peanuts and tree nuts the internet promises me that you can use sunflower seed spread |
| As many health benefits as raw, local honey may have, buy the cheap stuff for this recipe. You're going to cook it anyway |
| Vegans can use agave nectar instead of honey. |
| If you've got tree nut allergies in your family, use 2/3 c. of chunky peanut butter to give it that crunch. If you've got tree and peanut allergies, get some hulled sunflower seeds to add. |
| You can substitute the 1/3 c. of raisins for literally anything - miniature dark chocolate chips, dried cranberries, chopped dried apricots, etc. |
Spread the oats and almonds (or sunflower seeds) out on a cookie sheet and put them under your oven's broiler for 5 minutes or until slightly browned and toasted.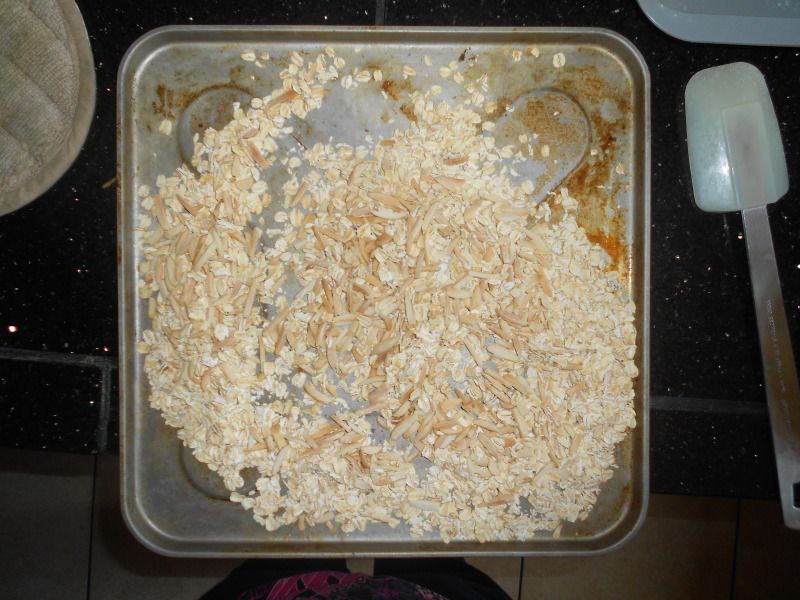 |
Instructions:
2. Pour the peanut butter mixture into a bowl with the oats, almonds, raisins, and rice cereal.
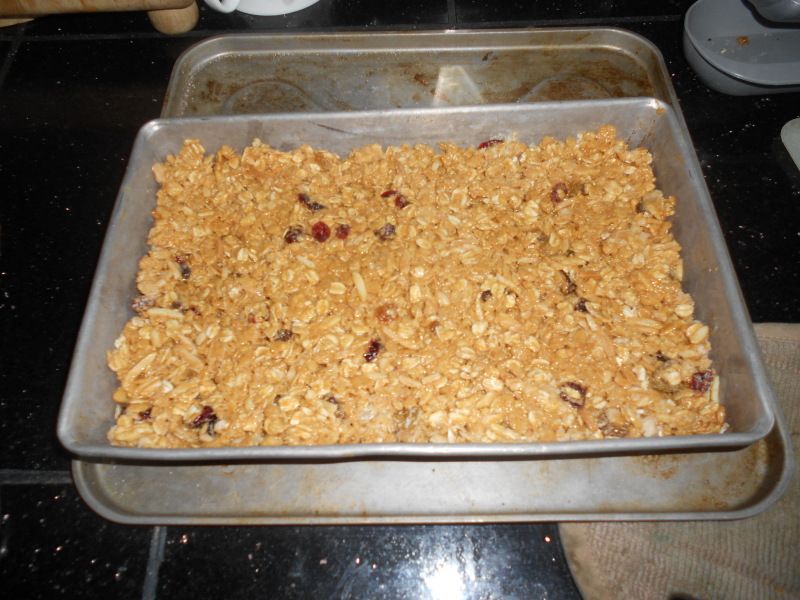
3. Mix all ingredients together until they're all the same color.
4. Oil your pan with some canola oil and press the mixture into the pan. Press as hard as you possibly can so that the mixture will stick together.
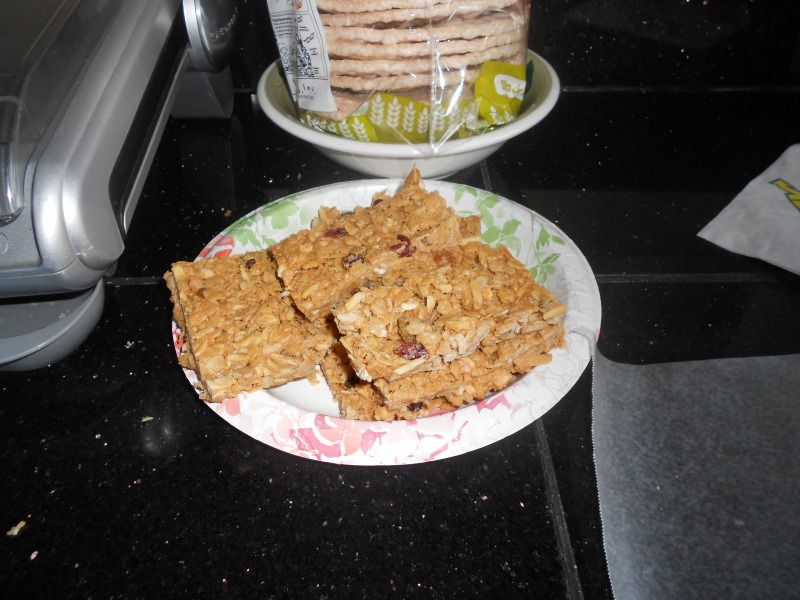
My experience with this recipe is that they taste amazing. However, they're very gooey. I'm having to keep the wrapped bars in the fridge to keep them solid.
Sunday, July 22, 2012
Corn Syrup isn't Sugar
I would like to introduce you to my least favorite commercial on television. Oddly enough, the company that makes it doesn't actually have it up anywhere on the internet, so you're getting an awfully filmed version from YouTube. I'll talk about why it makes me mad after it's over.
Once again, I'm going to remind you that these are just my personal views, and you are, in no way, required to believe what I believe. I should also mention that the First Amendment protects my right to say what I want to say.
C.Y.A. statements aside, I believe that corn syrup is the cornerstone upon which American obesity is built. I'll also mention that a lack of activity and crappy eating habits make up the foundation, but today, I'm going to tackle corn syrup. In 2010, the Corn Refiner's Association petitioned to have "high fructose corn syrup" renamed to "corn sugar." On May 30, 2012, the FDA rejected the petition on the grounds that sugar is defined as a solid, dry, crystallized food.
Regardless of the FDA's decision, it appears that the Corn Refiner's Association is attempting to get the American public to rename it themselves. I personally agree fully with the FDA because I feel like corn syrup provides a disservice to the American people.
I want to make it clear that I have nothing against corn or actually corn syrup in general. In fact, my daughter suffered from severe constipation when she was an infant, and her pediatrician recommended adding a teaspoon of Karo syrup to one of her bottles a day (before someone says something about nursing, I feel like I should say that I breastfed as long as I could). The reason it works is because corn syrup has a sugar alcohol called sorbitol that makes your intestines relax.
I also want to say that I have nothing against sweet things. I have issues with my weight because there's sugar in the world. However, I think that sugar from sugar cane is where most of our sweet stuff should come from and I have several reasons why.
Let's talk about pure numbers first. 1 teaspoon of high fructose corn syrup has 53 calories and 14 grams of carbohydrates. 1 teaspoon of granulated sugar has 16 calories and 4 grams of carbohydrates. That means that, even if you took in the 3.3 teaspoons of sugar you'd need to have the same amount of calories, you'd still have taken in almost 40 carbohydrates less than corn syrup. Since you need to take in about 750 g of carbohydrates per day, 1 teaspoon of high fructose corn syrup is 7% of your daily intake. That's pretty big, compared to 0.5% you'd get from your teaspoon of granulated sugar. It's worth mentioning that high fructose corn syrup is 6 times sweeter than sugar.
Okay, so let's move on to the difference between sucrose and fructose. Science time! (Sorry.)
 Meet sucrose, it comes from the sugar cane plant. It's a hydrocarbon with two six-sided rings connected by what we call an ether (the oxygen in the middle). Despite what many people think, sucrose is considered a complex carbohydrate. Complex carbohydrates are more difficult for your body to break down and store as fat.
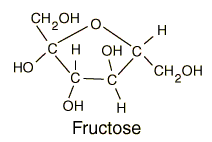 This is fructose. It's the sugar that's released from fruits and vegetables (that's why the "fru" part). It's a very simple sugar that your body can process and store as fat really really quickly.
So, that's the basic difference. For the record, all fructose does not come from corn. Any time you have a fruit or vegetable that's even a little sweet, it has fructose in it. However, you don't see concentrated apple juice being used in every little thing to sweeten it (it is a fantastic sweetener, but the point is still there). Your body can and does tell the difference between sucrose and fructose, and I'm about to tell you how.
I'm a favor of empirical research which means I like research that can be replicated and tells us things about ourselves. I have two very important studies that have to do with fructose vs sucrose in which you might be interested.
Researchers at Princeton University gave a large number of rats diets exclusively of sucrose and fructose measured to give the rats the same amount of calories. Now, no one's saying that you should eat a diet of exclusively sugar. This was a test to see what the difference of the two types of sugar would be. In the study, the rats who ate the fructose gained more weight, especially in the abdominal area, kept the weight on longer after returned to normal food, and had raised triglyceride levels which are unhealthy fats in the blood.
This is just the latest in the Princeton line of corn syrup studies. The link up there will take you to an article that lines them out, but they all come down to this: When you eat corn syrup, you gain more weight. If you don't know that being overweight is bad for your body, you should pay attention.
The second study comes from UCLA where they fed rats a high fructose diet once again. In this study, the rats' brains showed delayed responses after 6 weeks of a high fructose diet. That means, the more fructose you take in, the slower your brain works. If your kids' cereal has corn syrup in it, you might want to think about that before you send her off to school with that in her belly.
So, there's my rant on why you should be controlling your family's high fructose corn syrup intake. Really think about it the next time you're thinking of buying something with HFCS in it.
C.Y.A. statements aside, I believe that corn syrup is the cornerstone upon which American obesity is built. I'll also mention that a lack of activity and crappy eating habits make up the foundation, but today, I'm going to tackle corn syrup. In 2010, the Corn Refiner's Association petitioned to have "high fructose corn syrup" renamed to "corn sugar." On May 30, 2012, the FDA rejected the petition on the grounds that sugar is defined as a solid, dry, crystallized food.
Regardless of the FDA's decision, it appears that the Corn Refiner's Association is attempting to get the American public to rename it themselves. I personally agree fully with the FDA because I feel like corn syrup provides a disservice to the American people.
I want to make it clear that I have nothing against corn or actually corn syrup in general. In fact, my daughter suffered from severe constipation when she was an infant, and her pediatrician recommended adding a teaspoon of Karo syrup to one of her bottles a day (before someone says something about nursing, I feel like I should say that I breastfed as long as I could). The reason it works is because corn syrup has a sugar alcohol called sorbitol that makes your intestines relax.
I also want to say that I have nothing against sweet things. I have issues with my weight because there's sugar in the world. However, I think that sugar from sugar cane is where most of our sweet stuff should come from and I have several reasons why.
Let's talk about pure numbers first. 1 teaspoon of high fructose corn syrup has 53 calories and 14 grams of carbohydrates. 1 teaspoon of granulated sugar has 16 calories and 4 grams of carbohydrates. That means that, even if you took in the 3.3 teaspoons of sugar you'd need to have the same amount of calories, you'd still have taken in almost 40 carbohydrates less than corn syrup. Since you need to take in about 750 g of carbohydrates per day, 1 teaspoon of high fructose corn syrup is 7% of your daily intake. That's pretty big, compared to 0.5% you'd get from your teaspoon of granulated sugar. It's worth mentioning that high fructose corn syrup is 6 times sweeter than sugar.
Okay, so let's move on to the difference between sucrose and fructose. Science time! (Sorry.)
Meet sucrose, it comes from the sugar cane plant. It's a hydrocarbon with two six-sided rings connected by what we call an ether (the oxygen in the middle). Despite what many people think, sucrose is considered a complex carbohydrate. Complex carbohydrates are more difficult for your body to break down and store as fat. This is fructose. It's the sugar that's released from fruits and vegetables (that's why the "fru" part). It's a very simple sugar that your body can process and store as fat really really quickly.So, that's the basic difference. For the record, all fructose does not come from corn. Any time you have a fruit or vegetable that's even a little sweet, it has fructose in it. However, you don't see concentrated apple juice being used in every little thing to sweeten it (it is a fantastic sweetener, but the point is still there). Your body can and does tell the difference between sucrose and fructose, and I'm about to tell you how.
I'm a favor of empirical research which means I like research that can be replicated and tells us things about ourselves. I have two very important studies that have to do with fructose vs sucrose in which you might be interested.
Researchers at Princeton University gave a large number of rats diets exclusively of sucrose and fructose measured to give the rats the same amount of calories. Now, no one's saying that you should eat a diet of exclusively sugar. This was a test to see what the difference of the two types of sugar would be. In the study, the rats who ate the fructose gained more weight, especially in the abdominal area, kept the weight on longer after returned to normal food, and had raised triglyceride levels which are unhealthy fats in the blood.
This is just the latest in the Princeton line of corn syrup studies. The link up there will take you to an article that lines them out, but they all come down to this: When you eat corn syrup, you gain more weight. If you don't know that being overweight is bad for your body, you should pay attention.
The second study comes from UCLA where they fed rats a high fructose diet once again. In this study, the rats' brains showed delayed responses after 6 weeks of a high fructose diet. That means, the more fructose you take in, the slower your brain works. If your kids' cereal has corn syrup in it, you might want to think about that before you send her off to school with that in her belly.
So, there's my rant on why you should be controlling your family's high fructose corn syrup intake. Really think about it the next time you're thinking of buying something with HFCS in it.
Saturday, July 21, 2012
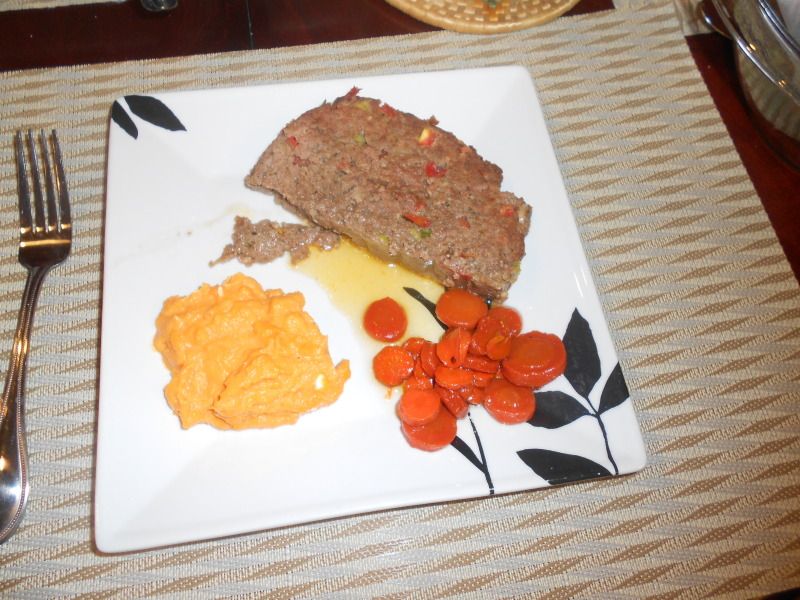
Your Weekly Frugal Recipe - Meatloaf
Meatloaf
The Food Stamp Way
| Skills | Prep | Cook | ||||||
|---|---|---|---|---|---|---|---|---|
|
|
| ||||||

Raise your hand if the last thing you think of when it comes to gourmet cooking is meatloaf. Now put your hand down, no one can see you. The thing with meatloaf is that it's a basic staple that can be changed into several different things. In fact my next few beef recipes (there is a pattern to these recipes) will be based off the meatloaf recipe that will be here and we'll transform it into meatballs, stuffed peppers and more!
| Equipment you'll need |
|---|
| knife, cutting board, mixing bowl, casserole dish, cooling rack (optional) |
| Ingredient | Amount | Cost |
|---|---|---|
| Ground beef | 2 lb | $2.99 |
| Pork sausage | 1 lb | $3.48 |
| Eggs | 2 | $0.15* |
| Bread crumbs | 1/2 c | $0.13* |
| Onion | 1/2 | $0.25* |
| Green onions | 3 | $0.31* |
| Garlic | 1 clove | $0.07* |
| Crushed tomatoes | 1, sm can | $0.66 |
| Total | $7.79 | |
| * Based on price per package divided by amount used. | ||
| If you don't eat pork, use 3 pounds of ground beef or find some chicken sausage. |
| 1/2 tsp of minced garlic in oil is the same as 1 clove. 1/8 tsp of garlic power is also the same as a clove. |
| If you don't have a can of crushed tomatoes you can also cut up 1 or 2 fresh tomatoes to use what's in your kitchen. |
| Mince your garlic if it isn't already or powder. |
| Chop your onion. It should be about 1/2 c. |
| Slice the green onions thinly. |
Instructions:
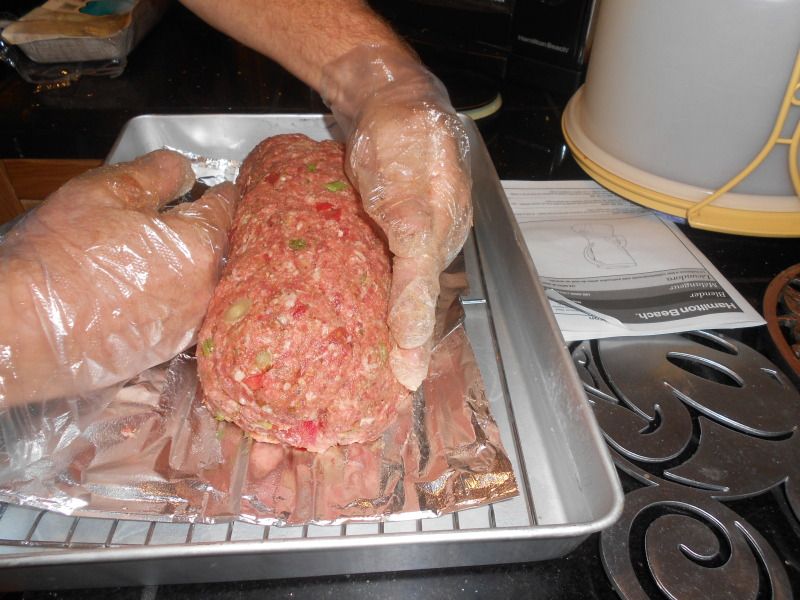
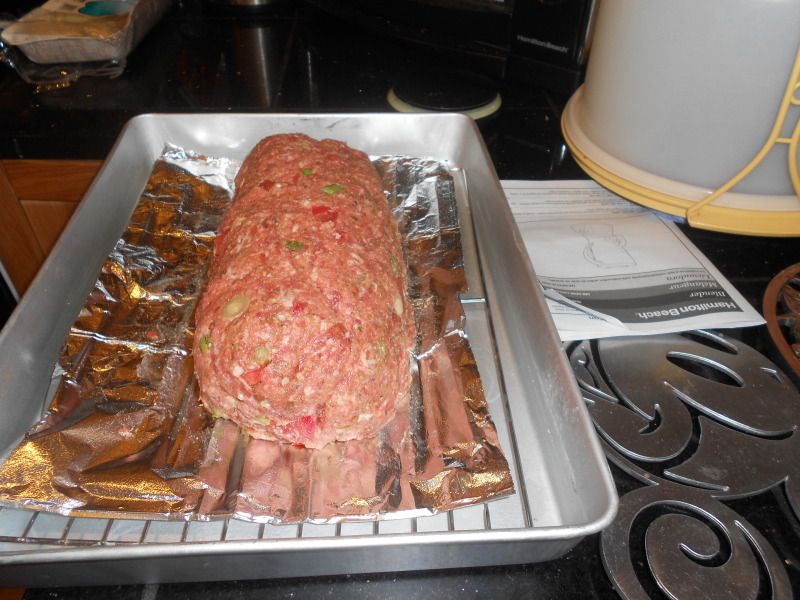
2. Mix all ingredients thoroughly.
(The movie's sped up. The whole process takes about a minute)
3. Form into a loaf.
What recipe would you like done the food stamp way? Comments? Questions? Tweet to @cookingcheap
Friday, July 20, 2012
Luxuries - Spices 3
This is the entry I've been looking forward to since I started the spice articles. It may seem strange to you, but this one entry has all my favorite herbs in it. See, when I was a kid and just starting to experiment with the flavor of herbs in cooking, I thought the song Scarborough Faire by Simon & Garfunkel was cooking advice. At the age of 9 or 10 that makes total sense. For that reason, for about 3 years, whenever I made anything from macaroni and cheese to grilled cheese to well, really anything that's acceptable for a child to make, I would add copious amounts of parsley, sage, rosemary, and thyme.
Since then, I've stopped adding parsley for reasons I'll mention in a minute, but I still add sage, rosemary, and thyme to anything in the Italian genre regardless of what the recipe says. I've also started adding oregano and basil. In fact, when I started my kitchen in my first apartment, those five are the first herbs I bought to make my kitchen run.
So, now you know my five favorite spices. They pretty much explain why I adore cooking Italian food. I'm sure you have your own or will find your own, and I can't wait to hear about them! Without any further ado, I give you the final installment of spices.
- Oregano is the leaf of a flowering plant in the mint family that’s native to the Mediterranean region and the Middle East. It has a strong taste that’s less sweet than basil and is very pungent. It’s a central herb in pizza sauce and many beef dishes.
- Paprika is a mixture of ground, dried peppers. There are several varieties of paprika, and depending on the country from which yours comes, they vary from mild to spicy. Interestingly enough, this is one of the few words that are remarkably similar across languages. In most stores, you’ll find either Spanish paprika or Hungarian paprika. Spanish paprika comes in three varieties – mild (dulce), moderate (agridulce), and spicy (picante). Hungarian paprika is usually very mild and pungent. That’s the kind you’ll usually find simply labeled “paprika” on your grocer’s shelves.
- Parsley is a leafy plant that’s related to cilantro. By itself, a sprig of parsley is actually a great breath freshener, but when added to a dish, I haven’t found that it adds anything. That’s why I stopped cooking with it, and stopped buying it dry altogether. When I want to use some parsley, I buy a bunch at the store for under 50¢ and chop it myself.
- Peppercorn also known as pepper is the dried fruit of a flowering plant native Southeast Asia and china. It comes in several different color varieties dependent on how the fruit is treated before you get it. You can get black pepper, white pepper, green pepper, and pink pepper (not actually pepper) in whole peppercorn varieties. You can also get ground black and white pepper. You’ll use more black pepper than any other kind, and someday, I’m going to write a full article just on pepper to explain all the ins and outs of it. Buy ground black pepper to refill your pepper shaker and we’ll discuss everything else later.
- Rosemary is hands down my favorite herb of all time. I love, love, love, love, love rosemary. If I could figure out how to put it in every single dish I cook, I would. Rosemary is the leaf of an evergreen bush. In fact, you can probably find it in the hedges outside businesses everywhere. Heck, I’m embarrassed to admit that I’ve pulled leaves off of them to chew on while walking around. Rosemary has a resonant flavor and aroma that is very similar to pine.
- Saffron is an herb you’ll probably never use. Not only is it usually used in either Spanish or Middle Eastern dishes, it’s freaking expensive. Seriously, this is the most expensive thing by weight in my kitchen, and I buy it cheap. At Trader Joes, I can buy 0.035 ounces of this stuff for $5. That’s $142 an ounce. Most saffron is $25 for a smaller amount. It averages about $500 per ounce which, at the time I wrote this was a third the price of an ounce of gold. Why is it so expensive? Because saffron is the stigma of the Spanish crocus and can only be harvested by hand. It takes over 8,000 flowers to make 3.5 ounces. Lots of work. Why do I have it? Because it has an amazing metallic/sweet taste that you just can’t get anywhere else. The next time Buddhist monks walk by in their yellow robes, the smell that follows them is saffron. That’s right, saffron is also a yellow dye for clothing. Guess what color it turns food!
- Sage is a flowering plant that literally grows everywhere. Garden sage is native to Europe and Asia minor. Mountain sage grows in the mountains in the U.S. It has a woody flavor and goes great on poultry and pork.
- Savory is related to both rosemary and thyme. It has a slightly salty, spicy flavor that is used as a salt substitute sometimes. It’s common in bean dishes as well as Italian dishes that need a little zest.
- Star Anise is an eight-pointed spice that has the seeds of the Chinese anise plant which is a type of evergreen. Interestingly enough, though they taste similar, star anise and anise are not related at all. They were named as such because they both have the same licorice taste, though star anise is far less pronounced. It’s used in some very culturally sound Chinese dishes. It’s also really pretty to look at.
- Tarragon is a leafy plant common to Europe. Who knew there were so many different herbs and spices that all taste like licorice? This one does too! Add that to the list.
- Thyme has teeny tiny leaves on a wooden stem. It’s used extensively in Italian dishes as well as herbal oils and soaps. It has a slight lemony, peppery flavor. It goes great on chicken.
- Vanilla is the fruit of the vanilla orchid. If you don’t know what vanilla smells like, go smell the bath aisle in your local store. Next to saffron, it’s probably the most expensive herb you’ll find. Instead of buying whole vanilla beans, which have a limited use, buy real vanilla extract. Though it’s slightly more expensive than artificial vanilla extract, there’s an amazing difference. Never taste raw vanilla extract, it’s awful.
Thursday, July 19, 2012
Techniques - Cutting Onions
Onions are one of those ingredients in recipes that make people cower in fear. First of all, they're a perfect sphere which makes a lot of people worried about the onion rocking in mid-cut and the knife slipping. Second, onion juice has sulfur in it, which when it evaporates irritates your eyes and causes them to water. That's why onions make you cry. The trick to onions is to cut them right, cut them fast, and cut them clean.
First, I'm going to skip all the techniques out there for avoiding the tears when you cut onions. The truth of it is, those tears are your body's way of cleaning itself. If you didn't have those tears, your eyes couldn't clean themselves. You can try all of them and tell everyone what works for you in the comments section, but I've never found a great way that works for everyone. Besides, the technique where you cut onions underwater just seems unsafe!
There are a few things I can tell you that will lessen your discomfort. First, if you chop onions with a non-serrated blade, it will lessen the amount of juices released which will also decrease the amount of sulfur gasses reaching your eyes. Make sure your knife is sharp. A dull blade will crush the onion and make more juice spray out. More juice = more gas = more tears. Finally, and this is very, very important, don't touch your face or eyes!!! If you put the juice on your face, the sulfur gas will reach your tear ducts much faster and make more tears. If you touch your eyes, you're going to tear up so badly you won't be able to cut safely.
You'll notice that, the more you cut onions, the less you'll cry. That's because you'll learn to work with the onion much faster than you've been. The faster you work, the less time you spend with the sulfur gasses coming up to your tear ducts. It's just a benefit of practice. However, ever so often, you'll get an onion that's so strong that you'll have tears running down your face no matter what.
So, let's get to peeling and cutting onions. This is one of those things I learned from a professional chef, came home and told my dad, and he said, "I've been telling you that for years." Oops. Well, I'm going to pass on the wisdom from my dad and a professional chef to cut your onions fast and easy.
First, you're going to take the loose skin off your onion and throw it away. Then you're going to cut your onion in half.
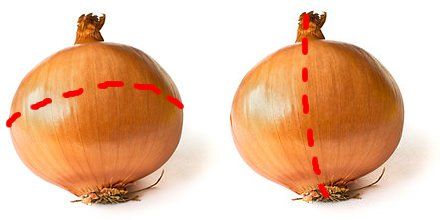 |
| Either way, it doesn't matter. |
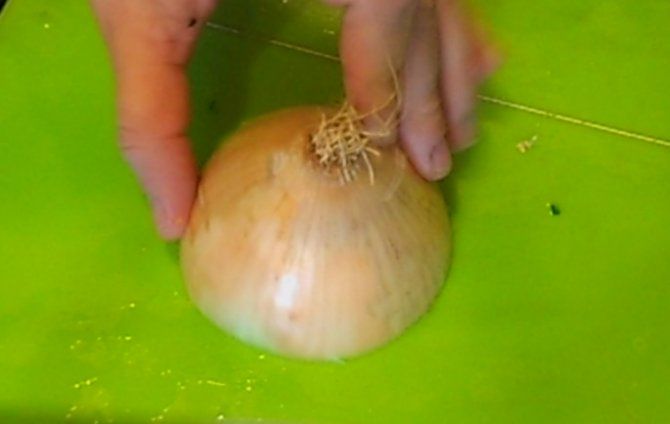
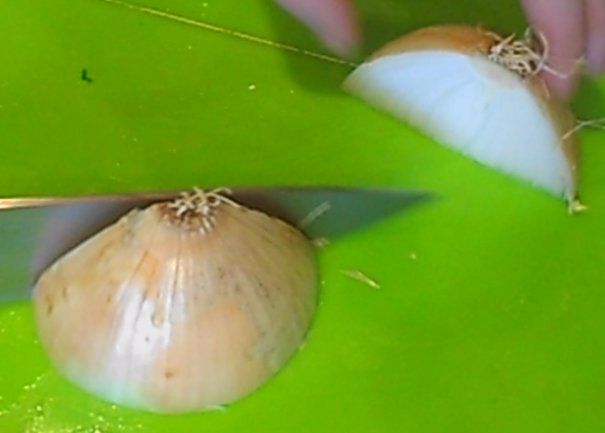
Next, you're going to cut off the root or tip from one of these pieces.
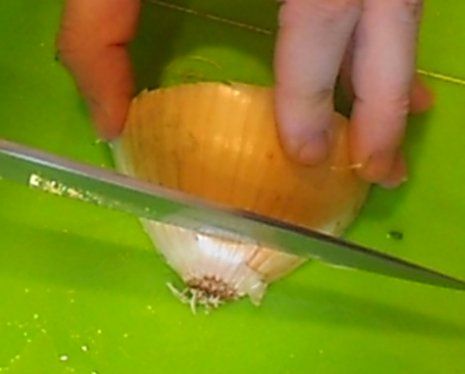
Once the root or tip is removed, you'll be able to easily remove the paper-thin skin from the onion.
Now, here your method changes depending on what you're doing with the onion. If you're slicing the onion, simply set your knife and make cuts along the widest part of the onion.
 | |
| Picture, courtesy of gracefulcuisine.com |
However, I like dicing my onions because they cook faster. No one ever seems to notice if they're sliced or diced unless you're making fajitas. Dicing's a little more involved, but once you practice at it, it's simple.
First you're going to make cuts along the lines of your onion, don't cut all the way to the back. Leave a little bit of room so the onion stays together. Once you're used to it, you'll cut all the way through. If you want, leave the root end on for this part so you have a stop point.
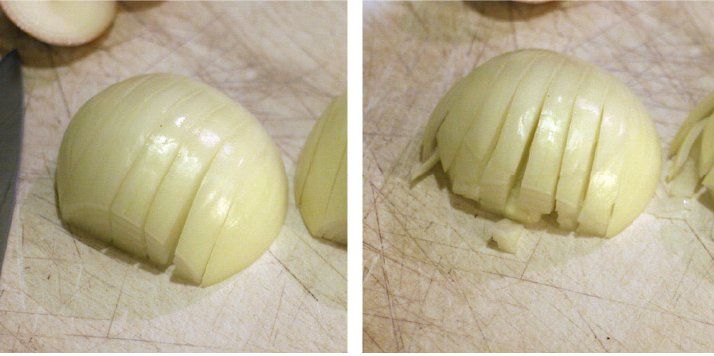
Here's where I differ from every other chef in the world. I don't think there's any need to make a cut that's parallel to the cutting board. Literally every chef I've ever seen teach how to dice onions makes a cut that looks like this:

When they're dicing. I don't understand it - at all. For one, if you slip while you're making that cut, you are going to cut yourself horribly. For another, as I have experimented greatly with this, There is absolutely no difference in the final size of the cubes that you produce. Really, I've tried it so many times that I feel like I can say confidently that making a cut parallel to the cutting board will not produce a smaller dice.
Instead, you're going to turn your onion 90º and repeat the slicing motion you just performed until the whole thing is in cubes. Some stick together, but you can break them up really easily.
Telling it to you in words and pictures is really difficult, so I took the time, while I was making Ratatouille, to take some video of me cutting an onion. Hopefully, watching it will help you understand what's going on. It's 2 minutes long, but it includes the whole onion, so you can stop anytime you like.
Subscribe to:
Posts (Atom)